
Sunday, June 30, 2013
Sunday centerfold
Wednesday, June 26, 2013
Miscellany, and... murder?
A few updates from the past weekend when I was finally able to catch up on things in the garden. I'll be honest - the reason there are not a lot of wide-angle pictures here is because the weeds are pretty out of control. I've kept up with the ones growing near my plants but much like a vacant lot in a neighborhood lowers the value of the surrounding homes... well, the vacant space in my garden is an eyesore. And during my free time this weekend it was either uncomfortably hot and humid, or rainy. Both circumstances are great for the plants, but not so great for my weeding efforts. But I digress...

The cucumbers, once the focus of much anxiety, seem to be thriving in the hot, humid weather we've had lately. Which is perfectly in keeping with my characterization of them as angsty teenage plants. It would figure that they'd love the weather that I hate the most!
 I put some mulch at the base of the cucumber plants to keep them from getting crabby.
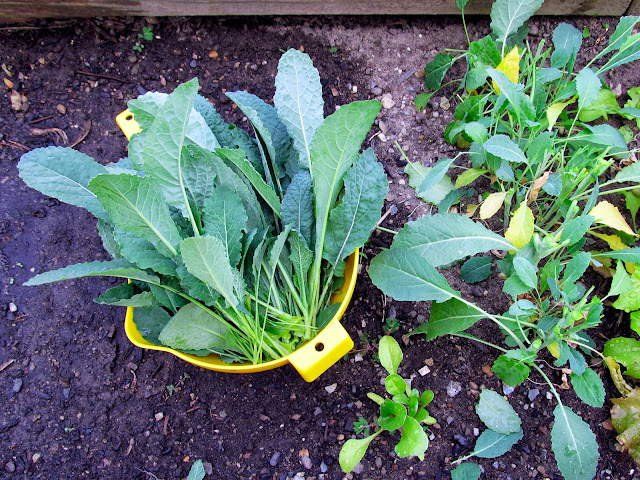 I harvested and cooked the Toscano kale. One great thing about it is that it is much easier to wash than its curlier counterpart! No dirt in our dinner! It cooked up nicely in a stir fry and there is still plenty more growing.
I sadly don't grow them myself, but I've come into a large amount of amazing locally grown strawberries lately. More on that to come, but in the meantime, here are some pictures that just looked too much like a crime scene to resist. My apologies to sensitive viewers.


And last but absolutely not least, I finally decided to do something about the fact that my third cat (and constant, fuzzy shadow) has not made an appearance on the blog. Sadly, she was a little resistant to our photo shoot. Must've been a bad hair day.


The cucumbers, once the focus of much anxiety, seem to be thriving in the hot, humid weather we've had lately. Which is perfectly in keeping with my characterization of them as angsty teenage plants. It would figure that they'd love the weather that I hate the most!


I sadly don't grow them myself, but I've come into a large amount of amazing locally grown strawberries lately. More on that to come, but in the meantime, here are some pictures that just looked too much like a crime scene to resist. My apologies to sensitive viewers.


And last but absolutely not least, I finally decided to do something about the fact that my third cat (and constant, fuzzy shadow) has not made an appearance on the blog. Sadly, she was a little resistant to our photo shoot. Must've been a bad hair day.

Tuesday, June 25, 2013
Oops! (or, how to end up with a lot of fennel)
Last year I wrote about my love of fennel. It is a lesser-known garden crop, but one that I love. I use fennel in Jamie Oliver's deliciously complicated homemade ketchup recipe that I make and can every year; I also add it to homemade vegetable stock and it is a great addition to the mirepoix step of any soup (chop it up and add right in with the onion, celery and carrots). It is also good raw in salad, and I'd love to try this recipe for fennel relish. I also recommend the fennel pickles at this restaurant if you having brunch in Philadelphia.
However, my own growing of fennel has been spotty at best. Last year the plants did not yield much, as least not in terms of nice healthy bulbs. The green fronds at the top are nice for adding flavor to soups (or seafood, which is not something I eat, but apparently pairs well), but the white part is where it's at! So this year I did a few things to improve the chances of getting some good fennel bulbs:
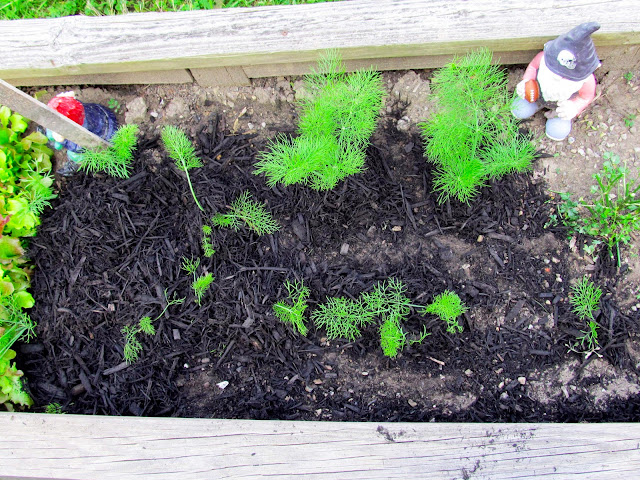
The row in the back (flanked by the gnomes) was on purpose. Most everything else was a mistake. I thinned these out and will see how things go, if I need to thin them out more. Also, it's hard to tell from this aerial photo, but the mulch is "mounded up" around the base of each plant to cover the developing white bulb.

Like so.
Fingers crossed, I'll have some of my own fennel to use this year!
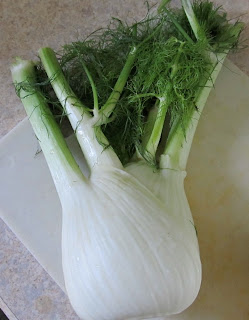 |
| This is totally store-bought. |
- Improve soil
- Plant more
- Buy mulch with which to "mound up" around the base of the plant. Soil did not seem to be sufficient last year.
- Spill a ton of fennel seeds by mistake and just sit back and watch what happens.

The row in the back (flanked by the gnomes) was on purpose. Most everything else was a mistake. I thinned these out and will see how things go, if I need to thin them out more. Also, it's hard to tell from this aerial photo, but the mulch is "mounded up" around the base of each plant to cover the developing white bulb.

Like so.
Fingers crossed, I'll have some of my own fennel to use this year!
Friday, June 21, 2013
Fernando Friday!
Here we go again...

Last night the little man was just a streak of shiny black hair as he evaluated the contents of the week's CSA bag. Fernando and I both came to the same conclusion: the salad marathon will continue! It's going to be another very green week (literally) in our house.
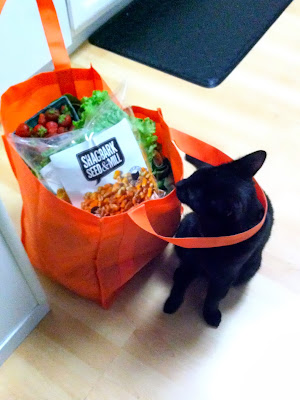
Growing out back I have kale that must be consumed and a new crop of salad mix. Last night I received Swiss chard, lettuce, spring mix, a giant head of cabbage, and spinach, among others (like that pretty - but dirty - head of cauliflower pictured above).
I willingly accept the challenge! Let's see what I come up with!
Anyone else out there feeling forced to consume salad like there's no tomorrow?
Thursday, June 20, 2013
Tomato training
In garden seasons past, I've raised some pretty unruly tomato plants. This year, it's my goal to keep the plants neater, for both aesthetic and scientific reasons. In the gardening class I took this spring, we learned that better-tended plants produce more fruit, and more airflow around plants can reduce pests and disease. In the class we received this drawing of a suggestion for how to stake and stabilize tomato plants:

Using this system, you only need one stake for every two plants, and don't have to fool around with those messy tomato cages. I feel like I managed a decent reproduction of this in my 2 rows of tomato plants:

I actually planted these seedlings several weeks ago, but had to wait for them to grow a few inches before I could weave the twine around them.

I'm really hoping this little system works. I've also been taking care to prune these plants like crazy, removing any sucks or very low "branches" that won't bear fruit. A friend told me that she prunes everything beneath the lowest flower - anyone heard of this? I don't have flowers yet but it's something I'll certainly try. Below is another picture from the gardening class - this one showing how to identify and prune a "sucker" - which is basically a stalk that does nothing but suck energy out of the plant and never produces a tomato. They are much more obvious once the plant is larger, but you don't want to wait too long as they will take nutrients away from your developing fruit!

So here's hoping that in a month or so I'll be able to celebrate another windowsill full of tomatoes. 10 plants should be enough for 2 people, right?
Monday, June 17, 2013
The good news...
... is that if we have salad for dinner tonight, we may finally have exhausted the supply. This after giving some away, inviting friends over for salad (don't you know that's the new thing to do?) and eating it what feels like non stop. So in this first mobile post, I'm treating you to a photo of salad on the go! (AKA on my desk)
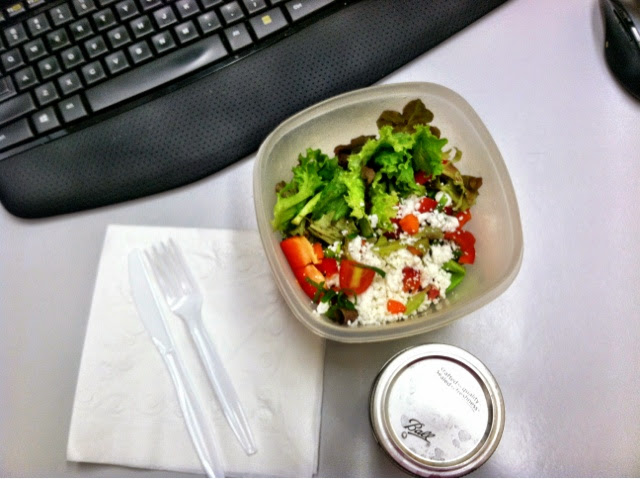
And guess what - I will be harvesting more before the week is through!
Salad days
I am sure some variation on this theme has happened to just about every gardener who's ever planted lettuce at this time of year. You know, the time when it all starts to grow.
One day, you have a little. Tear it up, rinse it off, run it through the salad spinner and leave it stored in the fridge.
Then, you have even more. It won't fit in the spinner, because that is already full of lettuce that you haven't finished yet.
Around this time, you are realizing that while you do really love eating salad, you are maybe feeling burned out on eating it every single day. You are running out of ideas. Especially since the tomatoes you're getting from the store aren't really that great in June. Your spouse simply begins declining every offer of salad.
Then, if you are me, and decided to join a CSA, you receive even more lettuce.
Which means you now have to find a tertiary location for it. The salad spinner is full, the crisper drawer is full, and pretty soon the entire bottom shelf of the refrigerator will be filled with greens.

And you still kind of don't feel like eating any more of it. So you try to give some away, but have a real concern that your mother-in-law isn't actually going to come over and pick up the giant bag you have made for her (far left, above).
That is what I am discovering is the problem with salad/mesclun mix. It has no other application. While you could enjoy spinach and kale raw or cooked, cooked lettuce seems very, very gross.
On the bright side, the succession planting sure is working!
And in other news, peas! Finally!
You'll be shocked to hear this, but those peas were chopped up and joined some of their friends....
 IN. A. SALAD.
One day, you have a little. Tear it up, rinse it off, run it through the salad spinner and leave it stored in the fridge.
Then, you have even more. It won't fit in the spinner, because that is already full of lettuce that you haven't finished yet.
Around this time, you are realizing that while you do really love eating salad, you are maybe feeling burned out on eating it every single day. You are running out of ideas. Especially since the tomatoes you're getting from the store aren't really that great in June. Your spouse simply begins declining every offer of salad.
Then, if you are me, and decided to join a CSA, you receive even more lettuce.
Which means you now have to find a tertiary location for it. The salad spinner is full, the crisper drawer is full, and pretty soon the entire bottom shelf of the refrigerator will be filled with greens.

And you still kind of don't feel like eating any more of it. So you try to give some away, but have a real concern that your mother-in-law isn't actually going to come over and pick up the giant bag you have made for her (far left, above).
That is what I am discovering is the problem with salad/mesclun mix. It has no other application. While you could enjoy spinach and kale raw or cooked, cooked lettuce seems very, very gross.
On the bright side, the succession planting sure is working!
And in other news, peas! Finally!
 |
| Not enough to share, but I was flying solo for dinner that night anyway. |

 |
| Who knew these inexpensive Ikea pasta bowls would be getting so much publicity? |
Wednesday, June 12, 2013
Kale City!
The good news is that the Toscano kale that I planted is flourishing - I plan to harvest it in the next few days.

The less-than-good news is that we also got a big bunch of Red Russian kale in our CSA bag last week. That means kind of a lot of kale for 2 people in one week. We do use some of this in juice, but I like trying to come up with other ways to cook it (besides the ubiquitous chips). And it absolutely had to be cooked last night, as it was starting to wilt quite depressingly in the fridge.
So, kale joined a few other random kitchen inhabitants in what I have decided to call "Mexican-Inspired Hash."
To make this, you will need the following:
1 medium yellow onion, chopped*
2 medium sweet potatoes (yams)
1 package of chicken sausage (I used Spicy Jalapeno, which inspired the "Mexican-Inspired")
as much kale as you need to get rid of
1 clove garlic
*You could also add peppers or mushrooms if you have them on hand - chop them in pieces the same size as the onions and add in the same step
In general, when I am not putting kale into juice or dehydrating it into chips, I cook it like this - adding it at the end of dishes that are akin to stir-fries. It cooks up quickly and adds nice color and vitamins to whatever you are making! I make something along these lines probably once a week, with whatever veggies we have on hand, with or without meat, sometimes with eggs, sometimes with cheese... the possibilities are really endless. You just need a generous saute pan and a hot stove!

The less-than-good news is that we also got a big bunch of Red Russian kale in our CSA bag last week. That means kind of a lot of kale for 2 people in one week. We do use some of this in juice, but I like trying to come up with other ways to cook it (besides the ubiquitous chips). And it absolutely had to be cooked last night, as it was starting to wilt quite depressingly in the fridge.
So, kale joined a few other random kitchen inhabitants in what I have decided to call "Mexican-Inspired Hash."
 |
| That blurriness in the middle frame is actually the steam coming off of my dinner - couldn't wait long enough to get a good photo! |
1 medium yellow onion, chopped*
2 medium sweet potatoes (yams)
1 package of chicken sausage (I used Spicy Jalapeno, which inspired the "Mexican-Inspired")
as much kale as you need to get rid of
1 clove garlic
*You could also add peppers or mushrooms if you have them on hand - chop them in pieces the same size as the onions and add in the same step
- Heat some oil in a large saute pan over medium heat and add the onions
- While the onions are cooking, peel and chop the sweet potatoes
- Add the sweet potatoes to the pan, stirring with the onions. At this point I also added a dash of Adobo seasoning, which imparts a nice "Mexican-Inspired" flavor
- While the potatoes and onions are cooking, slice and dice the sausage into small pieces
- Add the sausage, stirring again. Increase heat to medium high (I did this to add some browning/charring to the sausage and potatoes)
- Chop the kale into small pieces and add to pan
- Mince or finely chop one clove of garlic
- Add garlic to pan and reduce heat to medium-low. Toss all ingredients
- Cook until kale is your desired tenderness
In general, when I am not putting kale into juice or dehydrating it into chips, I cook it like this - adding it at the end of dishes that are akin to stir-fries. It cooks up quickly and adds nice color and vitamins to whatever you are making! I make something along these lines probably once a week, with whatever veggies we have on hand, with or without meat, sometimes with eggs, sometimes with cheese... the possibilities are really endless. You just need a generous saute pan and a hot stove!
Monday, June 10, 2013
Vegetable Confessions
Oh, it has been such a busy week, with jobs and rainstorms and sinus infections!
So there's been a lag in blogging, but not for lack of action in the backyard! Expect some updates.
But first, I'd like to come clean on a few things. Not everyday things, but things that most gardeners would keep as deep-dark-secret kind of things.
1) I never knew that pea shoots were edible until this week
2) I learned about pea shoots from the CSA that we joined and received our first bag from this week. I know, I know, what about all the stuff I am growing out back? Well essentially, I can't grow everything. I am limited in time, space, and expertise. I intentionally decided to focus on just a few crops this year that I've had success with in the past. And also - a CSA is a great chance to try some new things. Every week is like an episode of Chopped! Money well spent.
3) I do not actually enjoy pea shoots, at least not raw.
I was a little thrown by the pea shoots, but thanks to Google I discovered www.peashoots.com! Yes, an entire website devoted to pea shoots! I found a recipe for Pea Shoot and Strawberry Salad that sounded delicious (and for which I had all of the ingredients, excepting cucumber). I also added salt and pepper.
 So pretty, right?
Sadly, we did not enjoy it one bit. It is one of the worst things I have ever made. We mainly picked out the strawberries.
I'm wondering if perhaps our pea shoots were too mature to be eaten raw. The pictures on the Pea Shoot website appeared to have much smaller leaves. The tendrils and stems were very hard to chew. Dan deemed it "too raw" and I said it was "too much work to eat." Both were apt descriptions.
Next time, I'll cook the pea shoots.
(but that balsamic-honey-strawberry combo was lovely)
 |
| Butch is like, "I know you are busy but where is my second breakfast?" |
So there's been a lag in blogging, but not for lack of action in the backyard! Expect some updates.
But first, I'd like to come clean on a few things. Not everyday things, but things that most gardeners would keep as deep-dark-secret kind of things.
1) I never knew that pea shoots were edible until this week
2) I learned about pea shoots from the CSA that we joined and received our first bag from this week. I know, I know, what about all the stuff I am growing out back? Well essentially, I can't grow everything. I am limited in time, space, and expertise. I intentionally decided to focus on just a few crops this year that I've had success with in the past. And also - a CSA is a great chance to try some new things. Every week is like an episode of Chopped! Money well spent.
3) I do not actually enjoy pea shoots, at least not raw.
I was a little thrown by the pea shoots, but thanks to Google I discovered www.peashoots.com! Yes, an entire website devoted to pea shoots! I found a recipe for Pea Shoot and Strawberry Salad that sounded delicious (and for which I had all of the ingredients, excepting cucumber). I also added salt and pepper.

Sadly, we did not enjoy it one bit. It is one of the worst things I have ever made. We mainly picked out the strawberries.
I'm wondering if perhaps our pea shoots were too mature to be eaten raw. The pictures on the Pea Shoot website appeared to have much smaller leaves. The tendrils and stems were very hard to chew. Dan deemed it "too raw" and I said it was "too much work to eat." Both were apt descriptions.
Next time, I'll cook the pea shoots.
(but that balsamic-honey-strawberry combo was lovely)
Monday, June 3, 2013
Tarragon
We've been down this road before: what to do with tarragon?
This plant continues to really flourish and I can't bring myself to uproot it even though I seem to use like 6 pieces a year. I had to give it a major trim yesterday because it was starting to shade some of my other herbs. I decided to go ahead and make something out of it - something that would use quite a bit of it and was easy to do. Tarragon vinegar!
I found multiple recipes online and all were very similar and very simple. Perfect! Here is what you will need if you'd like to make this yourself:
Fill each jar or container about 1/2 full with tarragon leaves. Then muddle (or "smush") the leaves with a wooden spoon or other utensil. This will release some of the flavorful oils.
Pour vinegar over the leaves until the jar is almost full and the leaves are submerged.
Close up the jars and store in a cool, dark place for 2-4 weeks (I have these on a shelf in our basement pantry).
This makes an excellent addition to any homemade salad dressing!
This plant continues to really flourish and I can't bring myself to uproot it even though I seem to use like 6 pieces a year. I had to give it a major trim yesterday because it was starting to shade some of my other herbs. I decided to go ahead and make something out of it - something that would use quite a bit of it and was easy to do. Tarragon vinegar!
 |
| You will note 3 jars... one for me, and one for each of my sisters if they read this post! Just checking to see if you are following, ladies... |
- fresh tarragon
- vinegar (I used white vinegar since it is what I had on hand... white wine vinegar would certainly impart a more delicate flavor, and I also saw some recipes using apple cider vinegar)
- a clean jar (or several - I used 3 pint-sized jars as I was dealing with a major heap of tarragon!)
Fill each jar or container about 1/2 full with tarragon leaves. Then muddle (or "smush") the leaves with a wooden spoon or other utensil. This will release some of the flavorful oils.
Pour vinegar over the leaves until the jar is almost full and the leaves are submerged.
Close up the jars and store in a cool, dark place for 2-4 weeks (I have these on a shelf in our basement pantry).
This makes an excellent addition to any homemade salad dressing!
Sunday, June 2, 2013
Sunday centerfold
 |
| This is the clematis plant that is climbing up our deck. The flowers are gorgeous! |
Subscribe to:
Posts (Atom)